The Track Correction GUI
Although FAST's tracking accuracy can be >99%, sometimes this is not good enough. For applications that require particularly high quality tracking, a manual track correction module has been incorporated into FAST. This module supports two different type of correction:
- Track cutting, through which incorrect links are disconnected.
- Track fusing, through which correct but unassigned links are made.
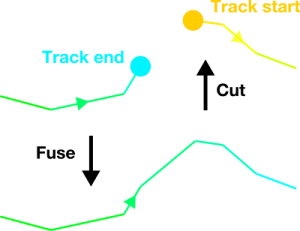
As indicated in the diagram above, these two processes are the opposite of each other. However, when faced with a large number of overlapping tracks, it can often be difficult to decide where each operation should be applied. To assist with this, the track correction module offers specialised, visual tools to perform each task effectively.
Module overview
After clicking Validate in the tracking module, the following GUI should appear:
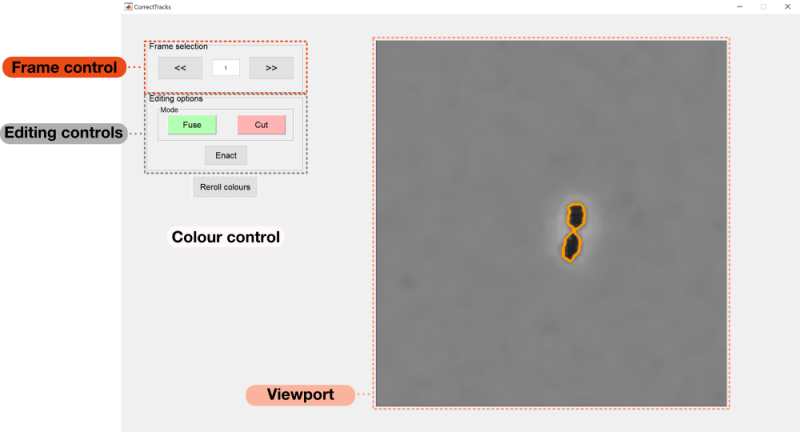
You can rapidly switch between frames by clicking the arrows in the Frame selection panel. You can also jump large distances in time by using the edit box in between.
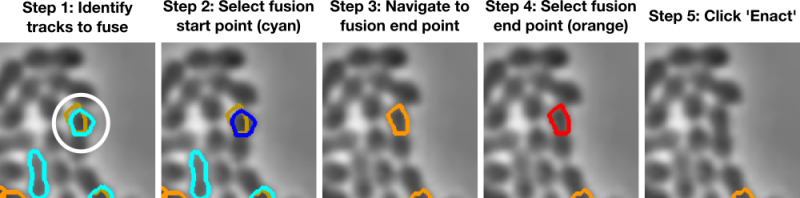
Track fusing
The default mode is the Fuse mode. In this mode, the viewport indicates any track endpoints present in the current frame in cyan and any track startpoints in orange. Startpoints present in the next frame are also indicated in a darker shade of orange, allowing endpoints in the current frame to be matched with putative partners in the next:
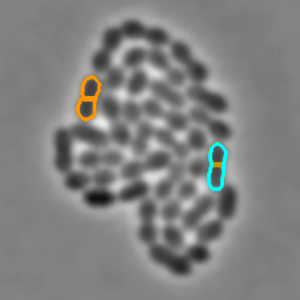
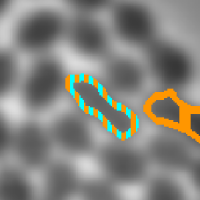
Some tracks only consist of a single timepoint. In these cases, the status of the associated object as both the start and end of a track is indicated by a dashed orange and cyan border:
To perform track fusion, first click the (cyan) endpoint of the earlier track you wish to fuse. Your selection should now turn blue, confirming the chosen object.
Next, navigate to the timepoint at which the startpoint of the second track you wish to fuse is present. Clicking on this object should cause it to turn from bright orange to red, confirming your selection. Now click the Enact button. You should see that your selected objects disappear from the viewport, indicating that they are no longer the start or endpoint of either track.
Track cutting
Upon selecting the Cut mode option, the viewport will change to a new appearance:
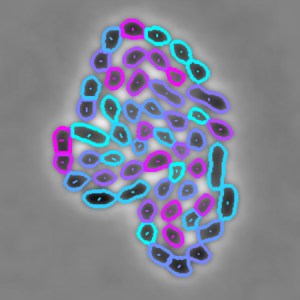
Each track is associated with a random shade of purple or blue. Each object at the selected timepoint is surrounded by a boundary of the colour of the corresponding track, and contains an arrow indicating the movement of the object between this frame and the next. The size of this arrow can be used to identify candidate false links, as incorrect links tend to cover large spatial distances. Objects at the end of their tracks do not contain an arrow.
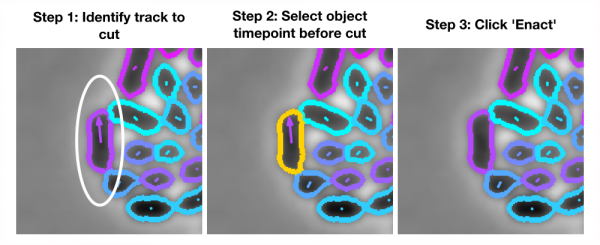
To apply a cut to a track, simply navigate to the timepoint at the start of the link you want to cut and click your chosen object. It will turn orange, confirming your selection. Now click Enact. The arrow in the centre of the object will disappear, confirming that the selected object no longer links to anything in the next frame.
Once you are happy with your corrections, simply close the track correction GUI. Your corrected tracks will now be reprocessed and saved, with the new distribution of track lengths appearing in the track length distribution window of the tracking module.