This is an old revision of the document!
The Division Detection module

In the tracking module, we sought the optimal way to integrate feature information to pair detected objects between frames. Division detection is conceptually similar, but instead of linking one object to another we wish to optimally use feature information to pair each mother cell with two daughter cells. This is achieved using a similar algorithm to the tracking module, with a few key modifications:
- Firstly, instead of assuming that features are stable between frames, we instead assume that they change instantaneously but predictably during cell division. An initial, pre-defined model of this process is refined by considering the statistics of a training set of divisions, automatically generated during an initial sweep through the dataset - further details of how this is implemented can be found here.
- Secondly, we relax the assumption that detected divisions must come after the last timepoint of the mother cell's track. In many cases, the segmentation module does not stably split mother cells into separate daughters, resulting in some temporal overlap between mother and daughter tracks. Simply assuming that daughter tracks must begin after their mothers' tracks would therefore prevent accurate daughter assignment. Instead, the end of the maternal track is subtracted from the start of each putative daughter track, and this time difference used as a new feature. This allows the feature weighting machinery to take into account variability in the (apparent) time difference between the end of the maternal track and the start of the daughter tracks.
Despite these differences, most of the machinery responsible for performing these assignments remains the same. The layout and usage of the division detection module is therefore very similar to that of the tracking module. For the purposes of conciseness, the below usage guide focuses on the ways in which the two modules differ, rather than providing a complete guide on each aspect of the division detection process. To initialise it, simply press the 'Divisions' button on the home panel. The following GUI should now appear:
Model training
Training the division detection module is very similar to training the tracking module. The processes of feature choice and training link inclusion proportion remain the same as before, although the relatively low number of division events compared to object-object links means that the histogram used to inform the choice of the training link inclusion proportion may not be very informative. One major difference does exist between the modules however: because temporal information is included as a feature, all 'training' divisions are effectively pooled into a single dataset, rather than being split by timepoint. As a result, the division detection module returns a single trackability score $R$, rather than a separate score for each timepoint. This is indicated in the top right-hand corner of the unnormalized step size distribution:
Model training is initialised as before, by clicking the Calculate! button. Once it has completed, division detection proper becomes available.
Division detection
Selection of the division threshold is also very similar to selection of the adaptive linking threshold in the tracking module, with the user repeatedly performing a cycle of threshold selection - division detection - validation - threshold update. However, unlike the tracking module, the relative sparseness of division events means that it is practical to perform threshold selection by repeatedly analysing the entire dataset, rather than a single pair of frames.
To perform initial division detection, simply click the Find divisions! button. One of two outcomes will then occur:
- If division detection completed successfully, the division viewer and lineage distribution windows will update.
- If division detection resulted in a lineage with a cycle (i.e. a cell marked as its own ancestor), the following warning notice will appear and the division detection process will be aborted:
In the case of scenario (2), the division threshold should be reduced until the warning notice ceases to appear.
Validation
To validate detected division events and help choose an appropriate division threshold value, FAST provides three separate validation tools. Again, these are similar to those tools found in the tracking module:
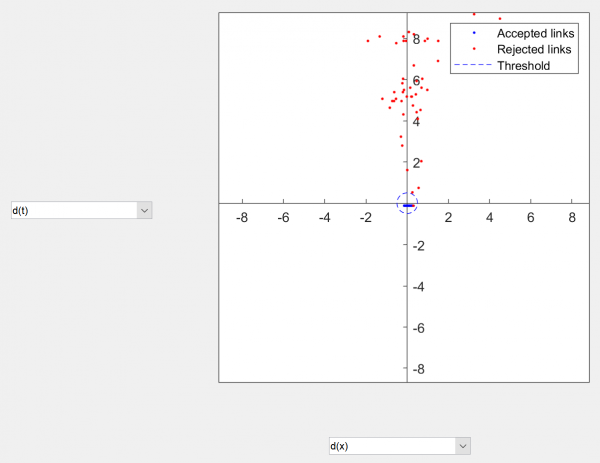
- The normalised division space viewer (top right hand corner) acts similarly to the normalised displacement space viewer. As in the tracking module, each feature (including time, denoted as 'd(t)') can be selected from the drop-down menus on the y- and x-axes. The normalised residual error between the internal model of division and the detected division events for the selected features will then be shown, allowing the user to verify that the error distribution is zero-centred and isotropic.
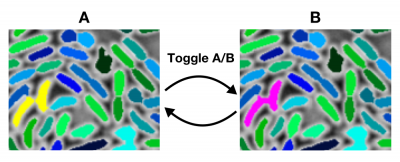
- The division viewer (bottom left-hand corner) acts similarly to the test tracking viewport. For each division event, maternal cells will be marked in yellow, while the corresponding daughter cells will be marked in purple. To switch between mother and daughter timepoints, click the Toggle A/B button in the View divisions panel. To move to the next division event in the series, click the Next division button.
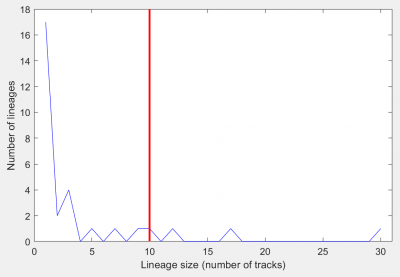
* The lineage size distribution is similar to the track length distribution. It indicates the total number of tracks incorporated into each cell lineage. For example, a cell that divided 3 times would result in a lineage that contained 15 tracks - this cell would be indicated in the lineage size distribution as an additional count in the bin at 15. The **Minimum lineage size** variable can be used to define a minimum cut-off in this lineage size distribution, allowing lineages that are below this threshold to be excluded from the final output. This is indicated in the distribution as a vertical red line.
Outputs
The division detection module does not produce a new variable as its output. Instead, it modifies the contents of the 'Tracks.mat' file. In particular, the following fields are added to the procTracks structure:
- D1 and D2: The numerical ID of this cell's daughters, if they exist.
- M: The numerical ID of this cell's mother, if it exists.
- Generational age: The age of the current cell, relative to the first object in its lineage (generation 1). Values are interpolated between the start and end of the current cell's lifespan - for example, a 3rd generation cell that is halfway between its birth and its own division would have a generational age of 3.5.
D1, D2 and M define a set of lineage trees for all the cells in the dataset. Tools for navigating and manipulating this lineage tree are available in the post-processing toolbox. In addition, tracks that are members of lineages below the Minimum lineage size threshold are removed from the procTracks structure. The toMappings and fromMappings structures are also updated to account for this change.
If needed, the original version of these track datasets (as output by the tracking module) is copied to the 'Pre-division_Tracks.mat' file, in the root directory.