The Segmentation module

In the first stage of the FAST pipeline, individual objects are segmented from the background. FAST's segmentation routine is integral to its ability to track objects in high-density systems, as it permits automated separation of thousands of closely-packed objects.
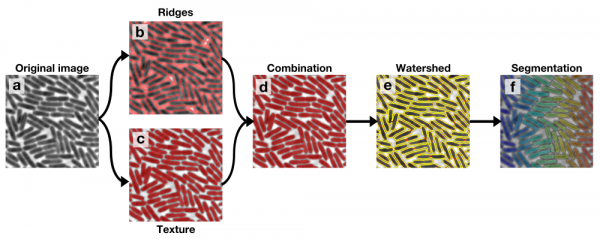
The segmentation algorithm is a multi-stage process, outlined below:
As can be seen from this diagram, earlier stages are integrated and used as the input to later stages. It is therefore important to optimise parameters for each stage sequentially. The process below runs through each stage and associated parameters in the recommended order.
Setup
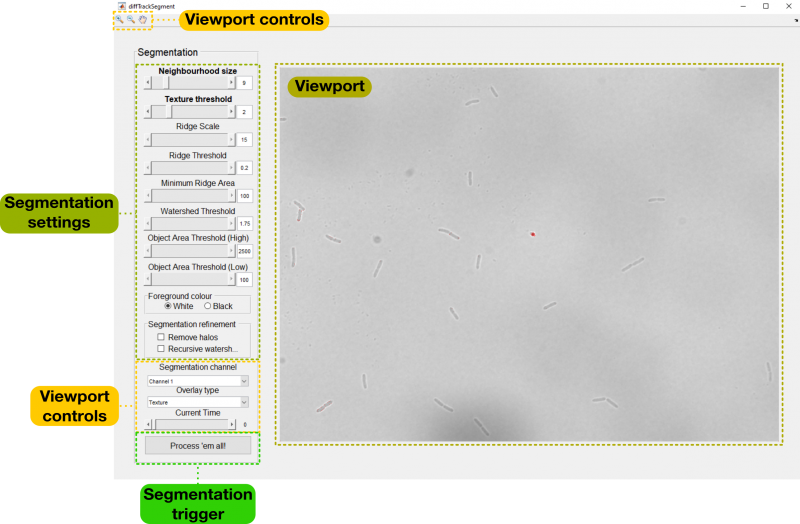
To run this module, click the Segmentation button on the home panel. This should bring up the following GUI:
To begin, you will need to set the channel you wish to use for segmentation using the segmentation channel dropdown menu. Channel 1 is typically the brightfield/phase channel, with additional channels associated fluorescence images. You will also need to choose if the objects within this image are bright or dark relative to the background. The appropriate option should be selected in the Foreground colour field.
Viewport control
The controls in the top left-hand corner of the GUI allow you to zoom (magnifying glasses) and pan (hand) the image shown in the main viewport. These tools allow the user to verify segmentation quality at high resolution.
Embedded within the segmentation settings are two further viewport controls: the current time slider allowing control of the current frame displayed within the viewport, and the overlay type dropdown menu allowing selection of a specific overlay.
Parameter selection
The key to a high-quality segmentation is the selection of good parameters. To assist with this process, each of the overlays under the Overlay type drop-down menu will allow you to optimise the parameters associated with each stage of the segmentation pipeline. We will begin with the default option, Texture.
Texture
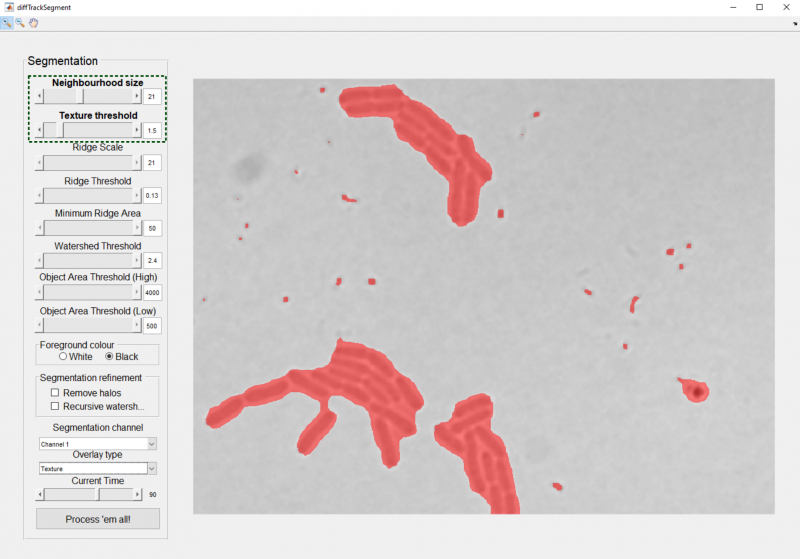
In the first stage of the pipeline, a texture metric is applied to the image. This provides a general separation of foreground (textured regions) and background (untextured regions), without necessarily separating closely-packed objects. In this overlay, red indicates regions classified as forground (objects):
The texture analysis stage is associated with two parameters:
- Neighbourhood size: This determines the spatial scale over which the texture is measured. In general, this value should be around the same as the width of your largest objects (in pixels).
- Texture Threshold: This determines the cutoff when binarising the texture metric. Reduce to make more of the image appear as foreground.
Ridge detection
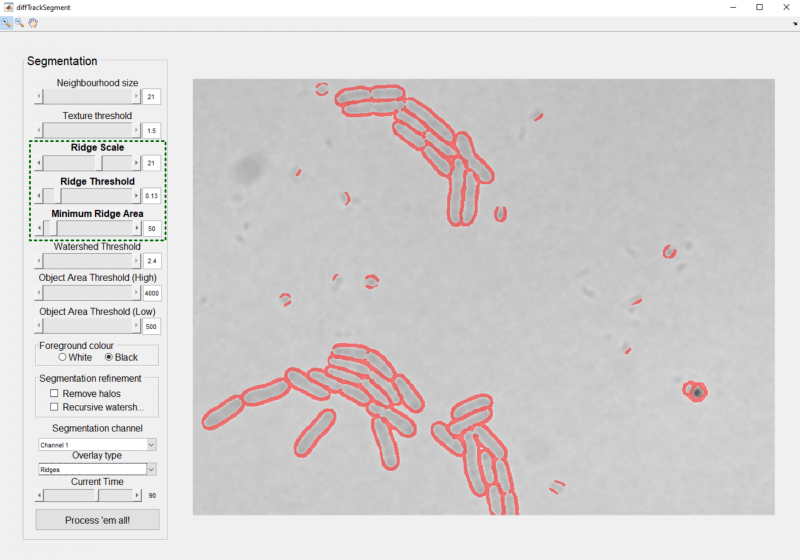
Ridge detection is the primary means by which closely-packed objects are separated from each other; boundaries between these objects are detected as ridges (dark-bright-dark or bright-dark-bright features) within the image. To begin choosing parameters, select the Ridges option from the Overlays dropdown menu.
There are three parameters associated with ridge detection:
- Ridge Scale: This determines the typical spatial scale of a ridge. Larger values tend to generate smoother ridges, and pick out larger features. Choose values greater than 10.
- Ridge Threshold: This determines the ridge detection cutoff when binarising the ridge image. Lower values increase ridge detection sensitivity, but also increase the amount of noise included. Choose values between 0 (all ridges) and 1 (no ridges).
- Minimum Ridge Area: This specifies the minimum size of a binary ridge. Larger values help to remove small ridges created by noise in the image.
In this overlay, red regions indicate the binary ridges that are subtracted from the binary texture image to generate an initial segmentation:
This initial segmentation is next refined by the application of the watershed algorithm.
Watershed
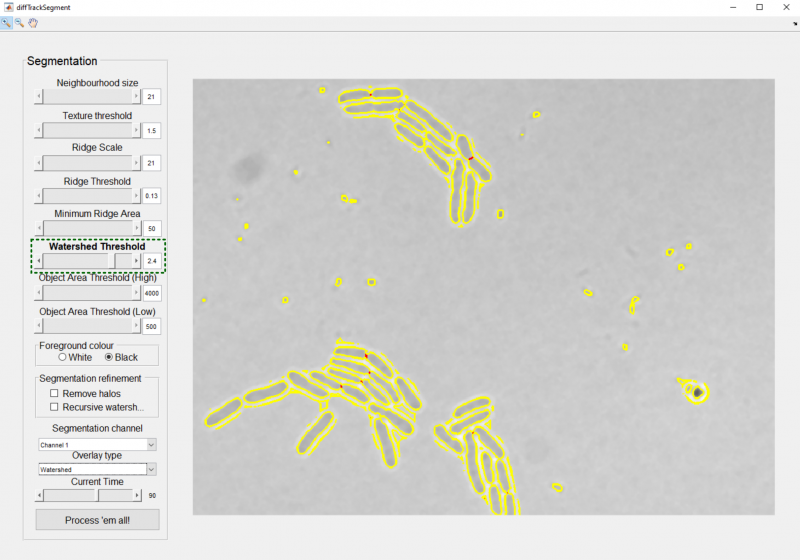
Choosing next the Watershed overlay option, your view should now switch to one consisting of red and yellow outlines:
These indicate the segmentation boundaries set by the combination of the threshold and ridge detection stages (yellow), and the boundaries added by the morphological watershed stage (red).
As can be seen in the above image, the watershed stage acts to complete the separation of objects that have been mostly (but not completely) separated by texture analysis or ridge detection. The strength of the watershed operation can be controlled by the Watershed threshold parameter. Lower values increase the number of cuts made by the algorithm, while higher values reduce the number of cuts.
Final segmentation
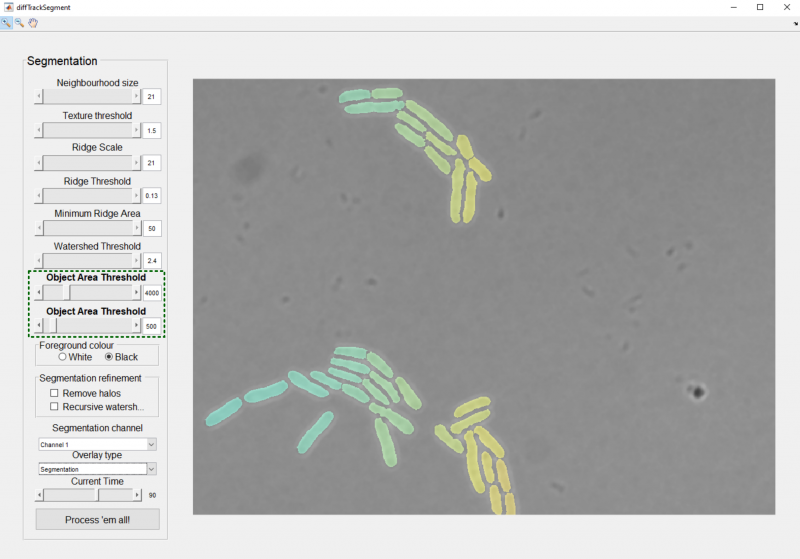
When the Segmentation overlay is chosen, you will be able to vary the Object area threshold (low) and Object area threshold (high) parameters. These parameters set the minimum and maximum area (in pixels) an object is allowed to fall between to be included in the final segmentation. In this overlay, each segmented object is indicated by a separate colour:
The two segmentation refinement checkboxes provide additional tools to further improve the quality of your segmentation:
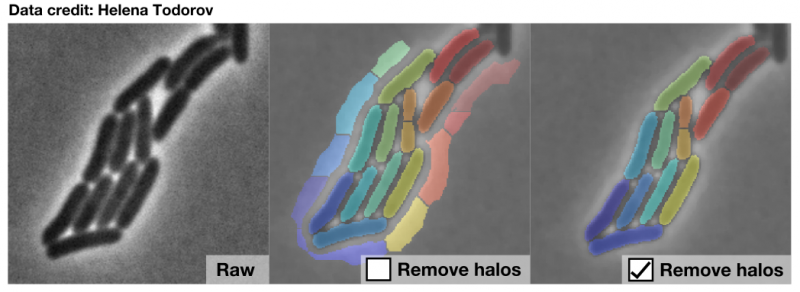
- Remove halos: This checkbox is intended for use with objects that are surrounded by bright halos, particularly phase-contrast images. The texture detection stage can struggle to separate these halos from the cell bodies, resulting in unwanted chunks of halo being detected as objects in the final segmentation. Upon selection of this option, the system will measure the average intensity of each segmented object and discard any that are substantially lighter than the dark population of objects.
- Recursive watershed: If the set of segmentation stages up to this point fails to separate some objects, they will typically remain in the image as large, fused clumps. By default, these clumps are removed when the Object Area Threshold (High) slider is set to a value smaller than their area. However, an alternative approach is to attempt to resegment these objects using less stringent parameters. By checking this box, you can recursively apply the watershed segmentation stage, progressively reducing the watershed threshold until all sub-objects are smaller than the specified threshold.
Once you are happy with your final segmentation, press the button labelled Process 'em all to start segmentation of the entire dataset. This will generate a new directory in your root directory and fill it with the segmented images.
Wait until the loading bar indicating segmentation progress has disappeared, and then close the segmentation GUI. You should now be able to click the next button in the home panel, allowing access to the feature extraction module. We will move to this in the next part of the tutorial.
